Tornado Interceptor Lab How to Intercept Tornadoes
Positioning, threshold respect, and survival habits for EF-scale chases in the Beta lab.
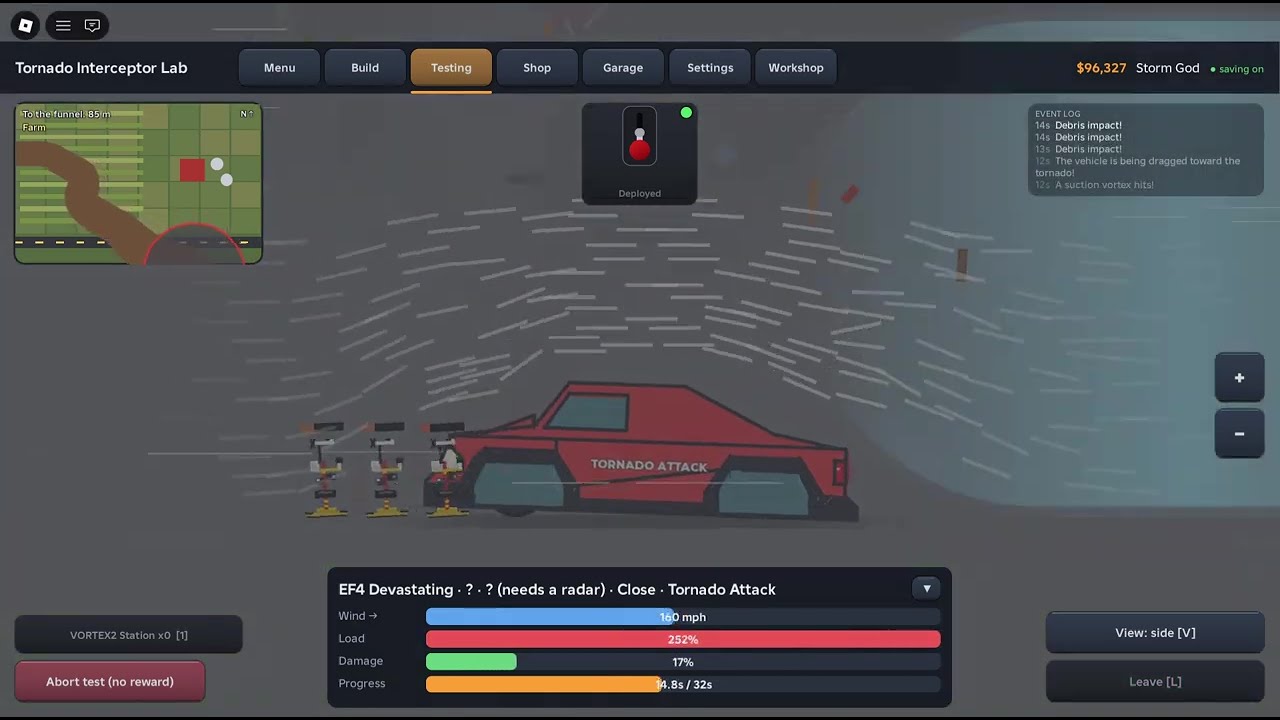
Intercepts are a system, not a stunt
Chasing storms in Tornado Interceptor Lab [Beta] looks like pure chaos from the thumbnail. Up close it is a system: scout, approach, deploy, commit, escape, log. This guide assumes you already have a low, flap-capable vehicle from How to Build and understand deploy inputs from Controls. If not, earn those reps first—wind does not grade on enthusiasm.
Know the threat language
Players talk in EF-scale terms. Treat the labels as a shared vocabulary for wind violence, not a courtroom document. Community conversation also mentions rare EF6 events around ~261+ mph. Whether a given server spiral is “truly” that strong matters less than whether your notebook says your current kit survived comparable buffeting.
Bring the Tools threshold table every serious session. Without notes, every wreck feels random.
Pre-chase checklist (90 seconds)
- Confirm flaps can cover wheels on your low body (+30–50 tip).
- Practice one dry deploy in the bay.
- Pick a role: scout (speed chaser), tank (flap S-tier), or spike commit (Dominator-like)—see Tier List.
- Scan lobby density; ~10 players means contested roads.
- Choose an escape heading before you smell dirt in the air.
Skip the romance; run the list.
Positioning fundamentals
Scout line
Approach from open ground where you can see the condensation funnel / debris signature and still turn away. Early Beta cameras and player traffic punish tunnel vision.
Offset, do not suicide-center
New chasers aim at the prettier center and donate their car. Experienced drivers work the edge, feel the push, then decide on deeper commitment once flaps are live.
Height of attack vs. height of car
Your vehicle height is a build problem; your approach elevation on rolling terrain is a driving problem. Avoid crests that unload tires right as wind peaks. Stay predictable so flap plates stay seated.
Multiplayer spacing
Do not park on someone else’s deploy animation. Clipping a flap sequence mid-extend can ruin two runs at once. Call lanes if your Players Discord group uses voice.
Deployment timing under pressure
Order of operations that matches community success stories:
- Commit to the approach path
- Deploy flaps early enough to cover wheels before the violent band
- Add spikes / secondary kits once the belt is online
- Micro-correct steering; avoid giant swerves that lift edges
- If coverage fails visually, abort—do not “hope”
Details and part rationale expand in Flaps, Spikes & Deployment.
Mid-guide storm study
Watch a real “new tornado attack” style gameplay clip to study camera pacing and how aggressive approaches look when they work. Compare their entry angle to your last attempt, then adjust one variable only.
Surviving high EF and rare EF6 talk
EF5 practice mindset
- Only enter with a QA-passed flap tank or equally disciplined Cad-like
- Accept that survival time is the score, not touching an imaginary bullseye
- Peel off with data if panels start departing
EF6 (~261+ mph) rarity mindset
Treat these as exam days. If your notebook lacks mid-tier consistency, you are sightseeing, not intercepting. Bring your best low shell, deploy earlier than feels dramatic, and be proud of a controlled retreat that preserves the car for another patch on the Updates calendar.
Speed chasers: how to help without feeding the storm
B-tier speed frames excel at finding cells and pinging routes. They die when asked to tank. In organized lobbies, scouts spot and tanks commit. Solo players should swap cars between scout and commit phases instead of forcing one chassis to be everything.
Failure taxonomy (fix faster)
| Symptom | Likely cause | Next experiment |
|---|---|---|
| Instant shred | Late flaps / exposed wheels | Earlier deploy, lower body |
| Flip on entry | High CG / sharp swerve | Soften approach, shed roof junk |
| Good flaps, still fail | Wrong storm tier for kit | Step down EF ambition |
| Random desync weirdness | Beta networking / hitch | Rejoin, retest once |
| Spike-heavy, flap-light | Cosplay commit | Rebuild per How to Build |
After-action loop
- Screenshot the wreck angle if useful
- Fill the Tools threshold row
- Change one build or timing variable
- Share non-toxic notes with builders
- Ignore anyone selling “guaranteed intercept scripts” (Scripts)
Mental model to keep
Intercepting is threshold management plus geometry. Paint does not save you. Hype does not save you. A low belt, honest flaps, calm hands, and a written log do. When those four align, Tornado Interceptor Lab stops feeling like a coin flip and starts feeling like the vehicle sim it claims to be—even while the Beta label still flashes in the corner.
Now pick a modest cell, deploy early, and earn the next line in your notebook.
Frequently Asked Questions
Quick answers about Tornado Interceptor Lab on Roblox.
When should I deploy flaps during a chase?
Early enough that wheels are covered before you enter the violent wind band—not after panels already shake.
Should I drive into the center of the tornado?
Generally no. Work the edge, evaluate push, then deepen commitment only if coverage holds.
What makes EF6 attempts different?
Community talk places them near ~261+ mph and treats them as rare exams—bring your best documented kit.
Can speed builds intercept high EF storms?
They scout well but often lack threshold. Swap to a flap tank for the commit phase when possible.
How do I know if a fail was a Beta bug?
Retest once on a fresh join. If the same input sequence fails the same way, log it; if not, suspect positioning or coverage.